
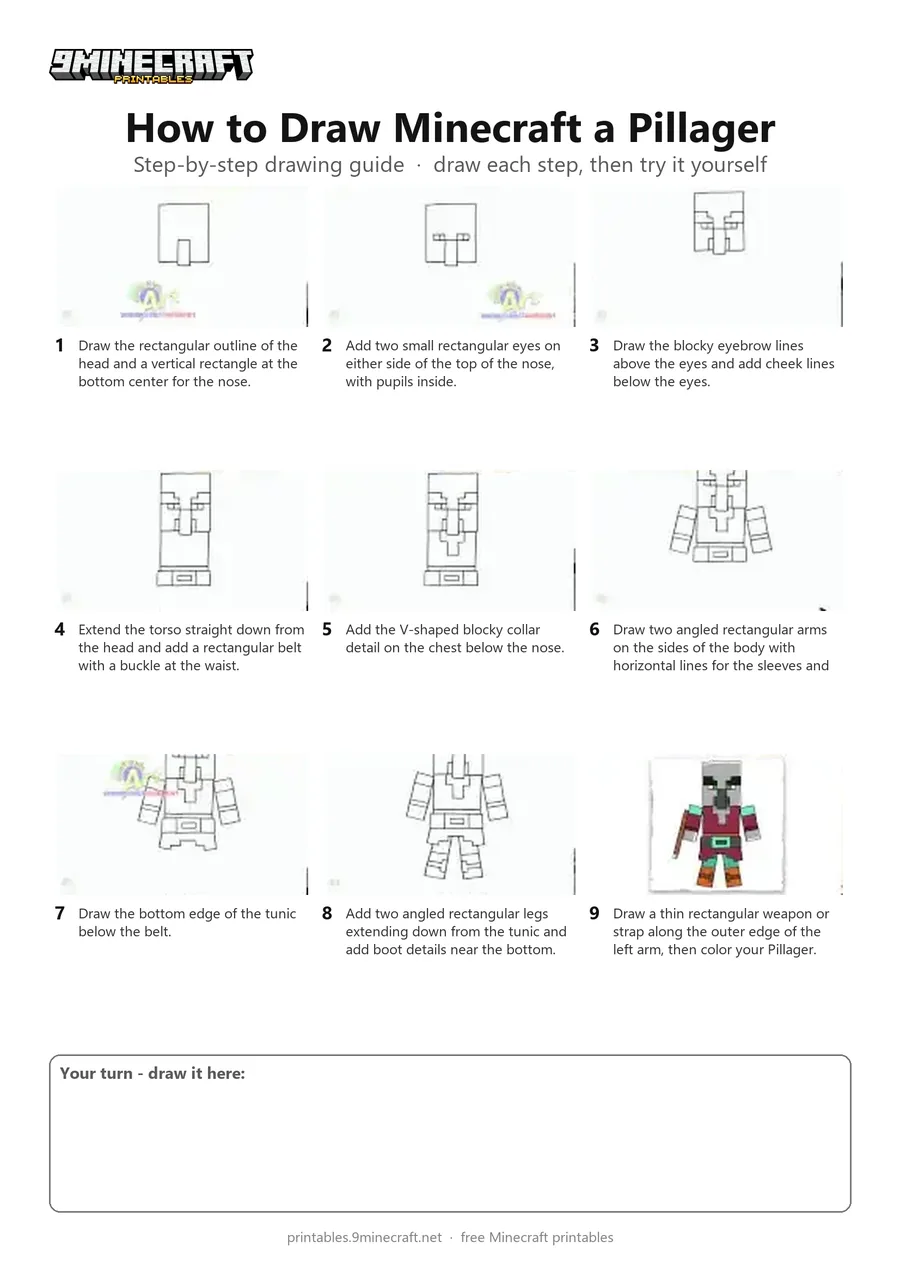
Learn how to draw a blocky Minecraft Pillager complete with its signature long nose, belt, and side detail. This tutorial breaks down the pixel-style character into simple rectangles and straight lines that are easy to follow. Free printable PDF for A4 and US Letter paper.
Print at 100% scale (“Actual size”). Plain printer paper works fine; crayons, colored pencils or markers all work.
 Draw the rectangular outline of the head and a vertical rectangle at the bottom center for the nose.
 Add two small rectangular eyes on either side of the top of the nose, with pupils inside.
 Draw the blocky eyebrow lines above the eyes and add cheek lines below the eyes.
 Extend the torso straight down from the head and add a rectangular belt with a buckle at the waist.
 Add the V-shaped blocky collar detail on the chest below the nose.
 Draw two angled rectangular arms on the sides of the body with horizontal lines for the sleeves and cuffs.
 Draw the bottom edge of the tunic below the belt.
 Add two angled rectangular legs extending down from the tunic and add boot details near the bottom.
 Draw a thin rectangular weapon or strap along the outer edge of the left arm, then color your Pillager.
You need: paper, black marker, colored markers.
Video by Cool Kids Art on YouTube.
 More How to Draw
 PDFHow to Draw Alex from Minecraft (Design 6)Pixel style · Ages 7-9
 PDFHow to Draw a Minecraft AxolotlPixel style · Ages 7-9
 PDFHow to Draw a Minecraft Bee (Design 3)Pixel style · Ages 7-9
 PDFHow to Draw a Minecraft ChickenPixel style · Ages 7-9
 PDFHow to Draw Minecraft Diamond Armor StevePixel style · Ages 7-9
 PDFHow to Draw a Minecraft Diamond (Design 2)Pixel style · Ages 7-9
 PDFHow to Draw a Minecraft Diamond (Design 3)Pixel style · Ages 7-9
 PDFHow to Draw a Minecraft Diamond Pickaxe (Design 2)Pixel style · Ages 7-9
 PDFHow to Draw a Minecraft Diamond Sword (Design 4)Pixel style · Ages 7-9
 PDFHow to Draw a Minecraft Diamond Sword (Design 5)Pixel style · Ages 7-9
 PDFHow to Draw an Evoker from MinecraftPixel style · Ages 7-9
 PDFHow to Draw Minecraft an EvokerPixel style · Ages 7-9