
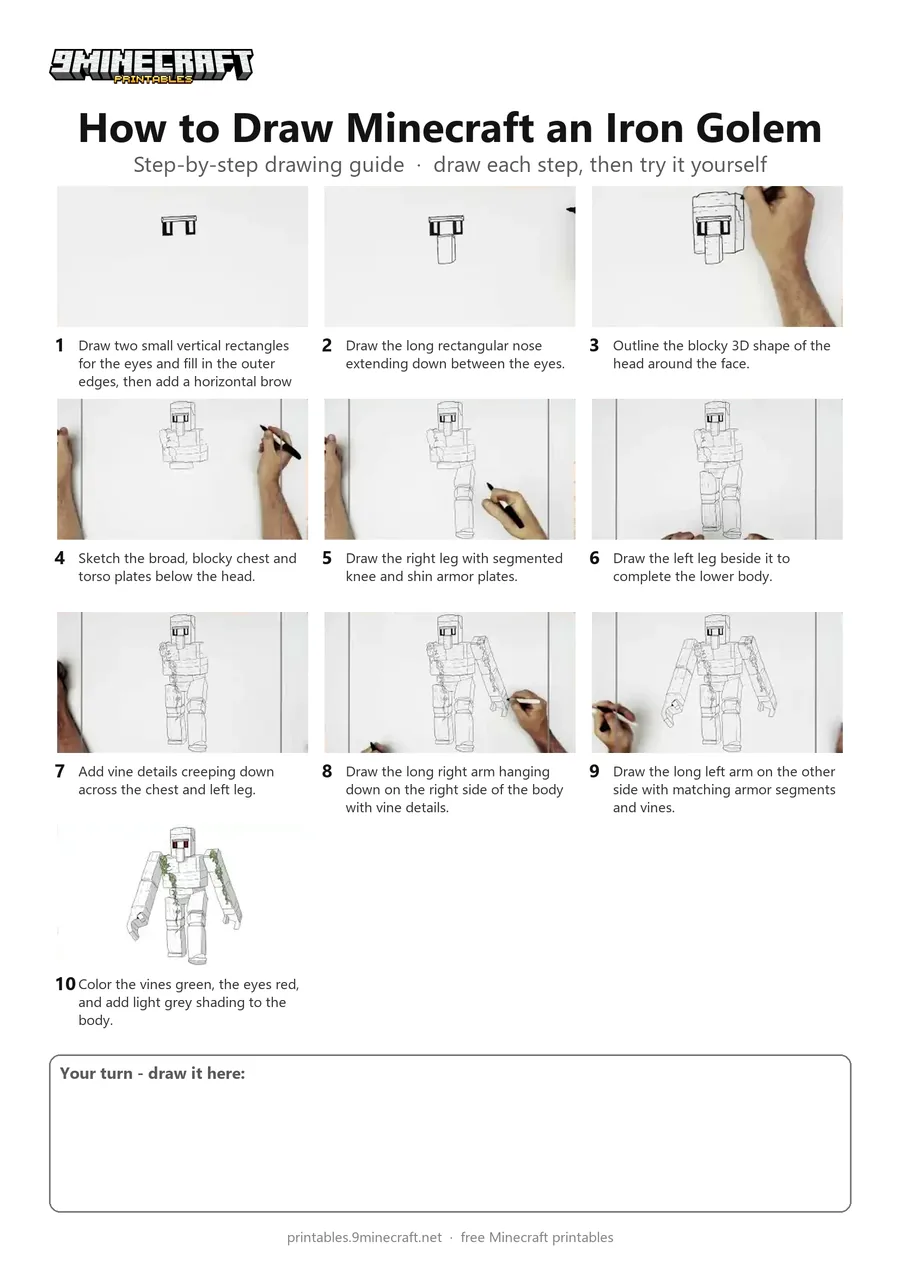
Learn how to draw a detailed 3D-style Iron Golem from the Minecraft Movie step by step. The tutorial builds the character from the head down to the legs and long vine-covered arms using a black marker before adding subtle color details. Free printable PDF for A4 and US Letter paper.
Print at 100% scale (“Actual size”). Plain printer paper works fine; crayons, colored pencils or markers all work.
 Draw two small vertical rectangles for the eyes and fill in the outer edges, then add a horizontal brow ridge above them.
 Draw the long rectangular nose extending down between the eyes.
 Outline the blocky 3D shape of the head around the face.
 Sketch the broad, blocky chest and torso plates below the head.
 Draw the right leg with segmented knee and shin armor plates.
 Draw the left leg beside it to complete the lower body.
 Add vine details creeping down across the chest and left leg.
 Draw the long right arm hanging down on the right side of the body with vine details.
 Draw the long left arm on the other side with matching armor segments and vines.
 Color the vines green, the eyes red, and add light grey shading to the body.
You need: paper, black marker, colored markers.
Video by Art.Simple. on YouTube.
 More How to Draw
 PDFHow to Draw 3D Alex from MinecraftDetailed · Ages 10+
 PDFHow to Draw Minecraft a Chicken Jockey (Design 5)Detailed · Ages 10+
 PDFHow to Draw Minecraft an Ender DragonDetailed · Ages 10+
 PDFHow to Draw Minecraft an Ender Dragon (Design 2)Detailed · Ages 10+
 PDFHow to Draw Minecraft a Piglin (Design 3)Detailed · Ages 10+
 PDFHow to Draw a Minecraft RavagerDetailed · Ages 10+
 PDFHow to Draw Minecraft a RavagerDetailed · Ages 10+
 PDFHow to Draw Minecraft the Ender DragonDetailed · Ages 10+
 PDFHow to Draw Minecraft the Ender Dragon (Design 2)Detailed · Ages 10+
 PDFHow to Draw Minecraft the Ender Dragon (Design 3)Detailed · Ages 10+
 PDFHow to Draw Minecraft the Wither StormDetailed · Ages 10+
 PDFHow to Draw Minecraft a 3D Floating CreeperDetailed · Ages 10+