
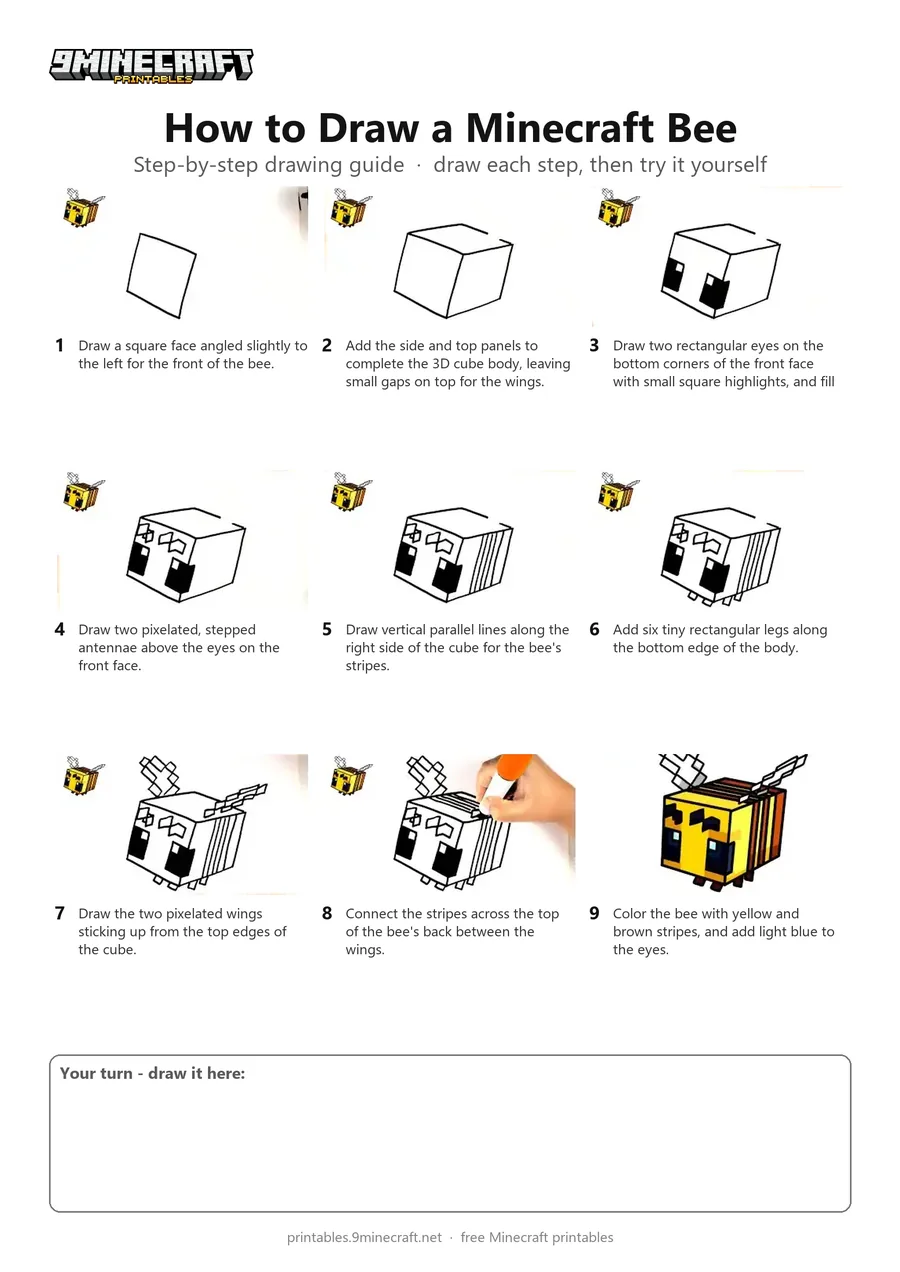
Learn how to draw a 3D blocky Minecraft Bee step by step on paper. Start with a simple cube for the body, then add pixelated eyes, antennae, striped sides, and wings before coloring it in. Free printable PDF for A4 and US Letter paper.
Print at 100% scale (“Actual size”). Plain printer paper works fine; crayons, colored pencils or markers all work.
 Draw a square face angled slightly to the left for the front of the bee.
 Add the side and top panels to complete the 3D cube body, leaving small gaps on top for the wings.
 Draw two rectangular eyes on the bottom corners of the front face with small square highlights, and fill the eyes in black.
 Draw two pixelated, stepped antennae above the eyes on the front face.
 Draw vertical parallel lines along the right side of the cube for the bee's stripes.
 Add six tiny rectangular legs along the bottom edge of the body.
 Draw the two pixelated wings sticking up from the top edges of the cube.
 Connect the stripes across the top of the bee's back between the wings.
 Color the bee with yellow and brown stripes, and add light blue to the eyes.
You need: black marker, colored markers.
Video by HappyART on YouTube.
 More How to Draw
 PDFHow to Draw a Minecraft Bee (Design 3)Pixel style · Ages 7-9
 PDFHow to Draw Alex from Minecraft (Design 6)Pixel style · Ages 7-9
 PDFHow to Draw a Minecraft AxolotlPixel style · Ages 7-9
 PDFHow to Draw a Minecraft BeePixel style · Ages 7-9
 PDFHow to Draw a Minecraft ChickenPixel style · Ages 7-9
 PDFHow to Draw a Minecraft Chicken (Design 3)Pixel style · Ages 7-9
 PDFHow to Draw Minecraft Diamond Armor StevePixel style · Ages 7-9
 PDFHow to Draw a Minecraft Diamond (Design 2)Pixel style · Ages 7-9
 PDFHow to Draw a Minecraft Diamond (Design 3)Pixel style · Ages 7-9
 PDFHow to Draw a Minecraft Diamond Pickaxe (Design 2)Pixel style · Ages 7-9
 PDFHow to Draw a Minecraft Diamond Sword (Design 4)Pixel style · Ages 7-9
 PDFHow to Draw a Minecraft Diamond Sword (Design 5)Pixel style · Ages 7-9