
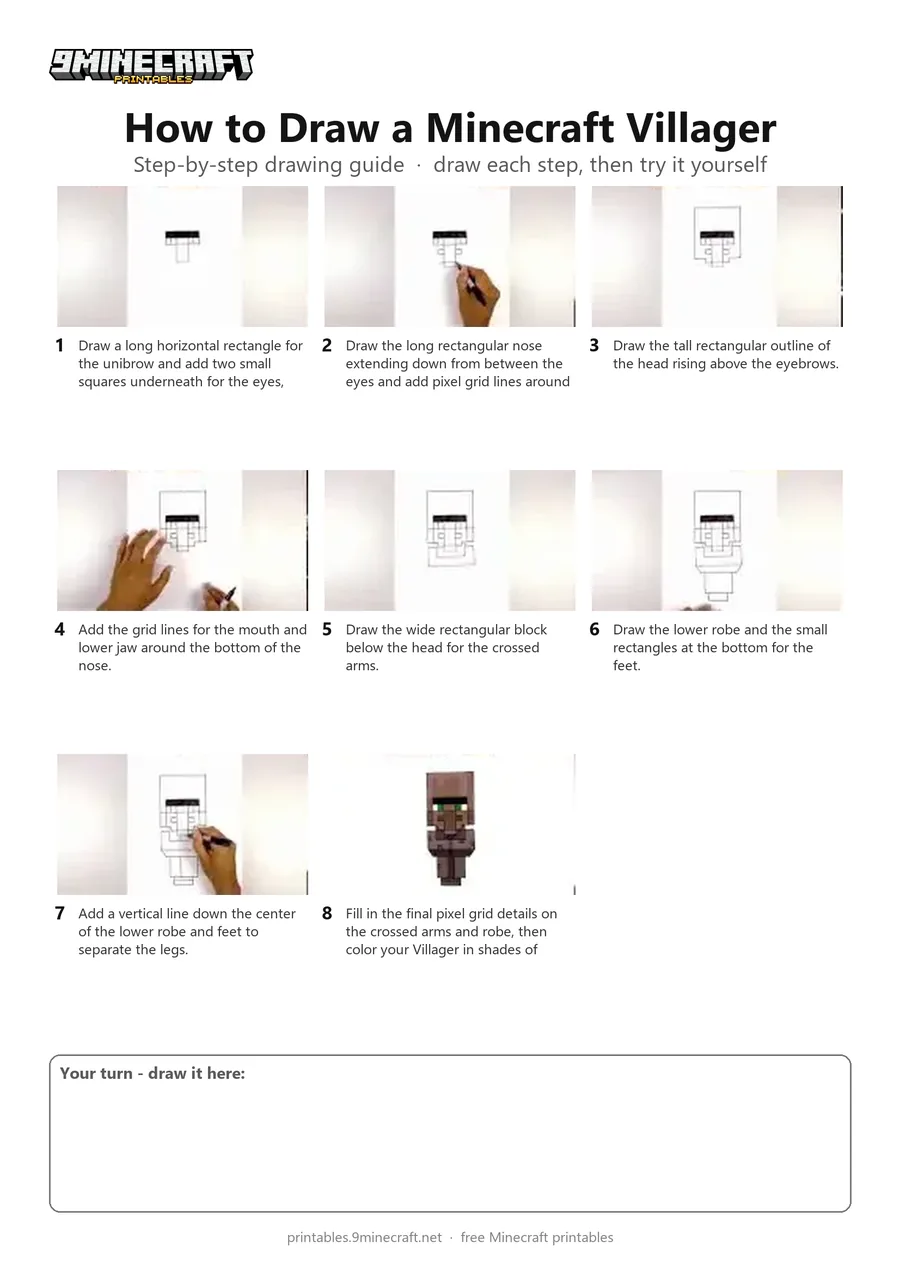
This tutorial shows how to draw a blocky, pixel-accurate Minecraft Villager standing with its arms crossed. The artist uses a black marker to carefully build the character from the eyebrows and nose outward to the head, robe, and feet. Free printable PDF for A4 and US Letter paper.
Print at 100% scale (“Actual size”). Plain printer paper works fine; crayons, colored pencils or markers all work.
 Draw a long horizontal rectangle for the unibrow and add two small squares underneath for the eyes, then color the unibrow black.
 Draw the long rectangular nose extending down from between the eyes and add pixel grid lines around the eyes and cheeks.
 Draw the tall rectangular outline of the head rising above the eyebrows.
 Add the grid lines for the mouth and lower jaw around the bottom of the nose.
 Draw the wide rectangular block below the head for the crossed arms.
 Draw the lower robe and the small rectangles at the bottom for the feet.
 Add a vertical line down the center of the lower robe and feet to separate the legs.
 Fill in the final pixel grid details on the crossed arms and robe, then color your Villager in shades of brown with green eyes.
You need: marker, paper.
Video by Cartooning Club How to Draw on YouTube.
 More How to Draw
 PDFHow to Draw a Minecraft AxolotlPixel style · Ages 7-9
 PDFHow to Draw a Minecraft Bee (Design 3)Pixel style · Ages 7-9
 PDFHow to Draw a Minecraft ChickenPixel style · Ages 7-9
 PDFHow to Draw Minecraft Diamond Armor StevePixel style · Ages 7-9
 PDFHow to Draw a Minecraft Diamond (Design 2)Pixel style · Ages 7-9
 PDFHow to Draw a Minecraft Diamond (Design 3)Pixel style · Ages 7-9
 PDFHow to Draw a Minecraft Diamond Sword (Design 4)Pixel style · Ages 7-9
 PDFHow to Draw a Minecraft Diamond Sword (Design 5)Pixel style · Ages 7-9
 PDFHow to Draw a Minecraft Frog Eating a Magma CubePixel style · Ages 7-9
 PDFHow to Draw a Minecraft Ghast (Design 2)Pixel style · Ages 7-9
 PDFHow to Draw Herobrine from Minecraft (Design 2)Pixel style · Ages 7-9
 PDFHow to Draw Minecraft an Iron Golem (Design 2)Pixel style · Ages 7-9