
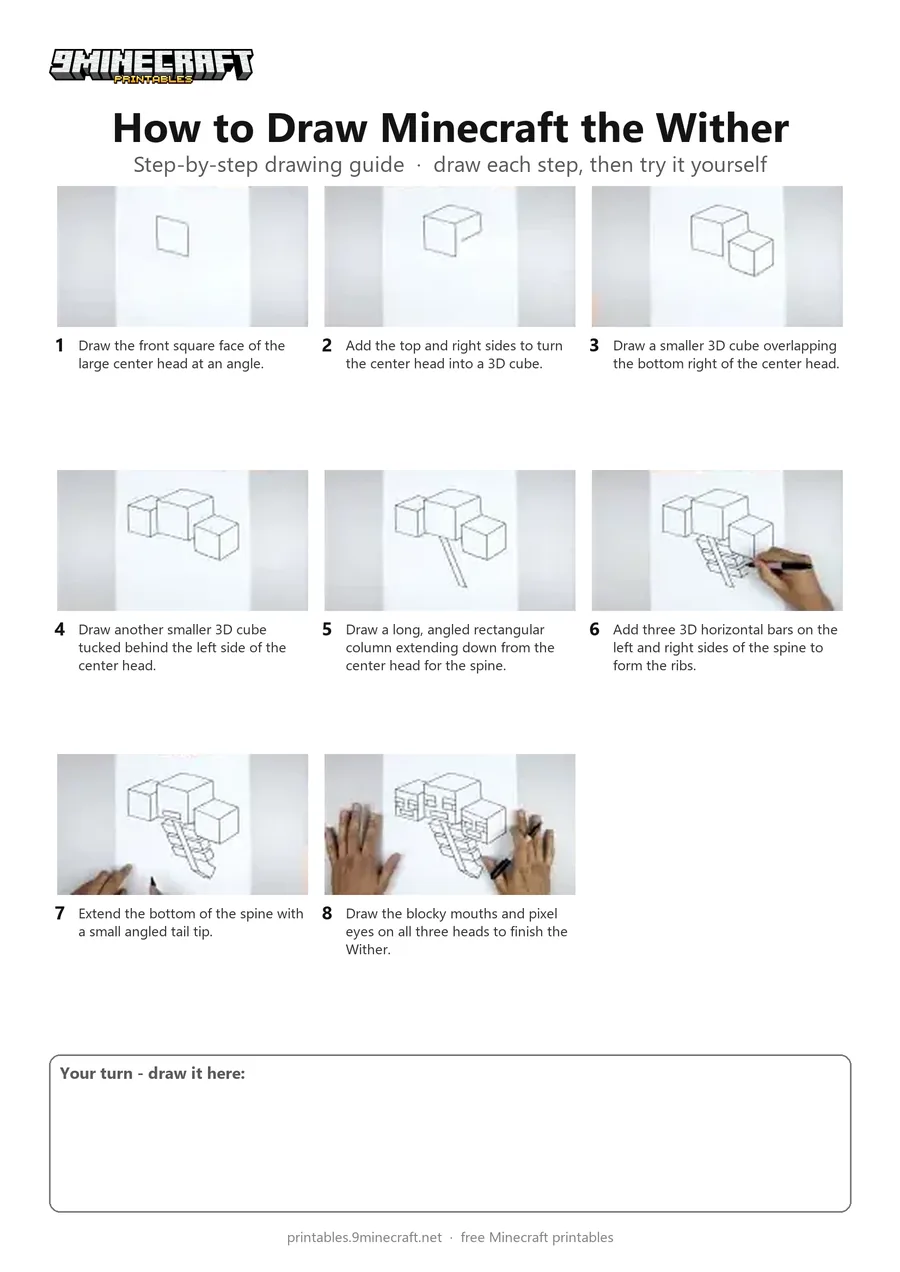
A step-by-step tutorial on how to draw the three-headed Wither boss from Minecraft in 3D isometric perspective. The artist uses a black marker to construct the cubic heads, skeletal ribcage, and pixelated facial features. Free printable PDF for A4 and US Letter paper.
Print at 100% scale (“Actual size”). Plain printer paper works fine; crayons, colored pencils or markers all work.
 Draw the front square face of the large center head at an angle.
 Add the top and right sides to turn the center head into a 3D cube.
 Draw a smaller 3D cube overlapping the bottom right of the center head.
 Draw another smaller 3D cube tucked behind the left side of the center head.
 Draw a long, angled rectangular column extending down from the center head for the spine.
 Add three 3D horizontal bars on the left and right sides of the spine to form the ribs.
 Extend the bottom of the spine with a small angled tail tip.
 Draw the blocky mouths and pixel eyes on all three heads to finish the Wither.
You need: paper, black marker.
Video by Cartooning Club How to Draw on YouTube.
 More How to Draw
 PDFHow to Draw Minecraft a 3D Floating CreeperDetailed · Ages 10+
 PDFHow to Draw a 3D Minecraft ZombieDetailed · Ages 10+
 PDFHow to Draw a Minecraft AxolotlPixel style · Ages 7-9
 PDFHow to Draw a Minecraft ChickenPixel style · Ages 7-9
 PDFHow to Draw a Minecraft Frog Eating a Magma CubePixel style · Ages 7-9
 PDFHow to Draw a Minecraft Ghast (Design 2)Pixel style · Ages 7-9
 PDFHow to Draw Herobrine from Minecraft (Design 2)Pixel style · Ages 7-9
 PDFHow to Draw Minecraft an Iron Golem (Design 2)Pixel style · Ages 7-9
 PDFHow to Draw a Minecraft LlamaPixel style · Ages 7-9
 PDFHow to Draw a Minecraft OcelotPixel style · Ages 7-9
 PDFHow to Draw a Minecraft Panda Eating CakePixel style · Ages 7-9
 PDFHow to Draw a Minecraft ParrotPixel style · Ages 7-9