
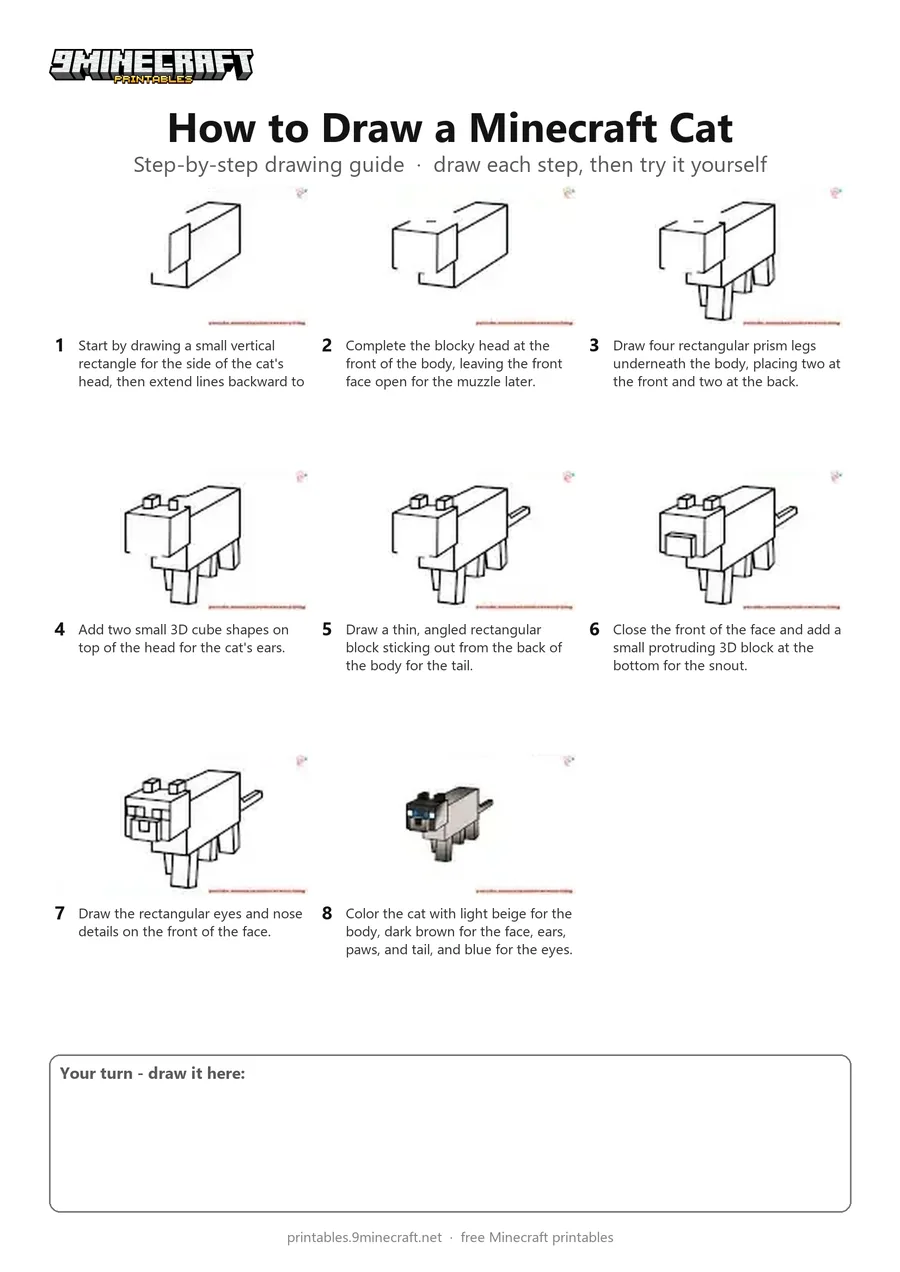
This tutorial teaches you how to draw a 3D blocky Minecraft Siamese cat step by step. Starting with simple rectangular blocks for the head and body, you will add the legs, ears, tail, and pixelated face details before coloring it in. Free printable PDF for A4 and US Letter paper.
Print at 100% scale (“Actual size”). Plain printer paper works fine; crayons, colored pencils or markers all work.
 Start by drawing a small vertical rectangle for the side of the cat's head, then extend lines backward to create the long rectangular body block.
 Complete the blocky head at the front of the body, leaving the front face open for the muzzle later.
 Draw four rectangular prism legs underneath the body, placing two at the front and two at the back.
 Add two small 3D cube shapes on top of the head for the cat's ears.
 Draw a thin, angled rectangular block sticking out from the back of the body for the tail.
 Close the front of the face and add a small protruding 3D block at the bottom for the snout.
 Draw the rectangular eyes and nose details on the front of the face.
 Color the cat with light beige for the body, dark brown for the face, ears, paws, and tail, and blue for the eyes.
You need: pencil, pen, colored pencils.
Video by Easy To Draw Everything on YouTube.
 More How to Draw
 PDFHow to Draw a Minecraft CatPixel style · Ages 7-9
 PDFHow to Draw Minecraft an AllayPixel style · Ages 7-9
 PDFHow to Draw a Minecraft BeePixel style · Ages 7-9
 PDFHow to Draw a Minecraft Chicken (Design 2)Pixel style · Ages 7-9
 PDFHow to Draw a Minecraft CowPixel style · Ages 7-9
 PDFHow to Draw a Minecraft Creeper FacePixel style · Ages 7-9
 PDFHow to Draw a Minecraft Creeper (Design 6)Pixel style · Ages 7-9
 PDFHow to Draw a Minecraft Diamond AxePixel style · Ages 7-9
 PDFHow to Draw a Minecraft Diamond Axe (Design 2)Pixel style · Ages 7-9
 PDFHow to Draw a Minecraft Diamond Axe (Design 3)Pixel style · Ages 7-9
 PDFHow to Draw a Minecraft DiamondPixel style · Ages 7-9
 PDFHow to Draw a Minecraft Diamond PickaxePixel style · Ages 7-9