
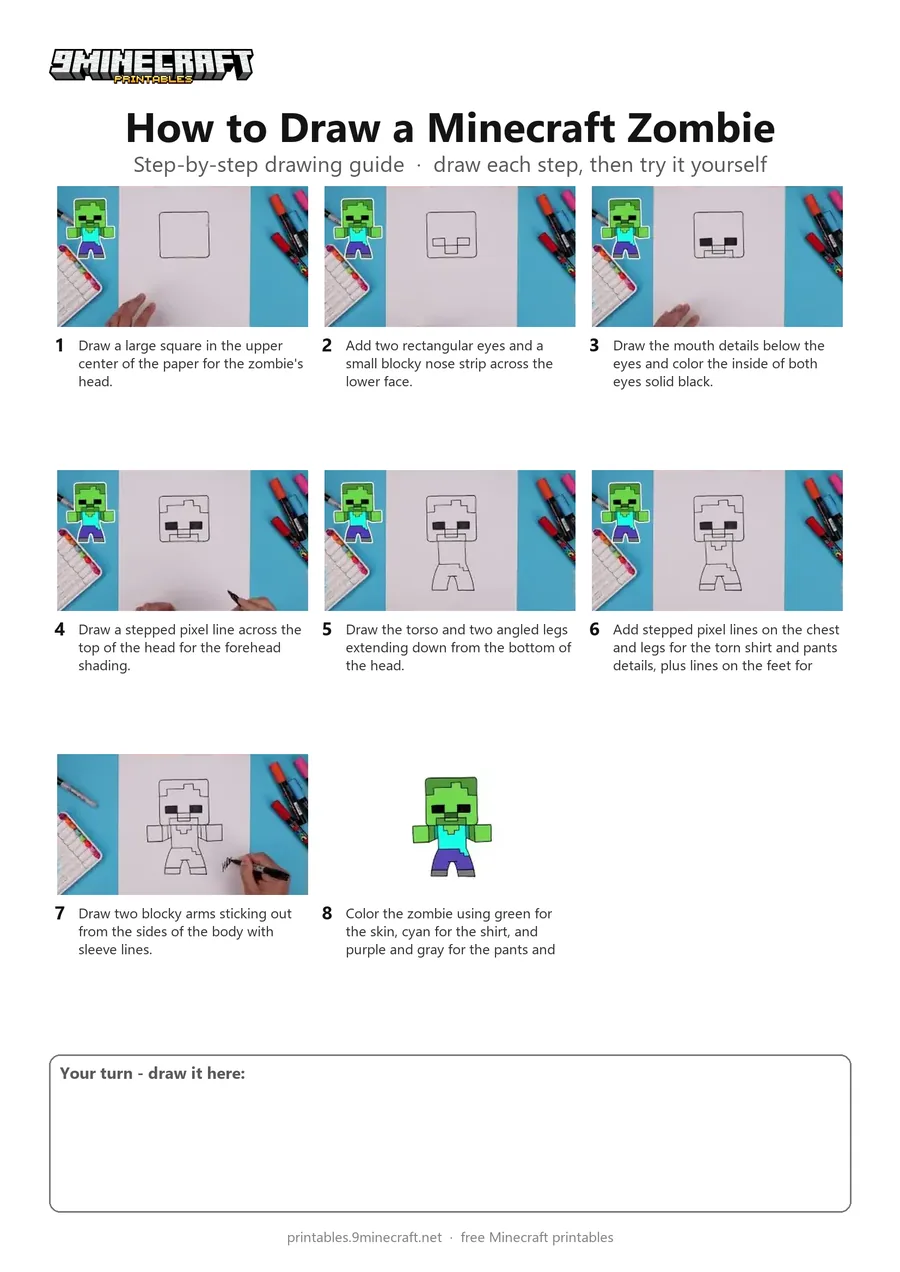
Learn how to draw a cute blocky Minecraft Zombie standing with its arms out. This easy tutorial uses simple straight lines and blocky pixel shapes that kids can follow along with a black marker. Free printable PDF for A4 and US Letter paper.
Print at 100% scale (“Actual size”). Plain printer paper works fine; crayons, colored pencils or markers all work.
 Draw a large square in the upper center of the paper for the zombie's head.
 Add two rectangular eyes and a small blocky nose strip across the lower face.
 Draw the mouth details below the eyes and color the inside of both eyes solid black.
 Draw a stepped pixel line across the top of the head for the forehead shading.
 Draw the torso and two angled legs extending down from the bottom of the head.
 Add stepped pixel lines on the chest and legs for the torn shirt and pants details, plus lines on the feet for shoes.
 Draw two blocky arms sticking out from the sides of the body with sleeve lines.
 Color the zombie using green for the skin, cyan for the shirt, and purple and gray for the pants and shoes.
You need: paper, black marker, colored markers.
Video by Cartooning Club Junior on YouTube.
 More How to Draw
 PDFHow to Draw a Cute Minecraft ZombieCute / chibi · Ages 7-9
 PDFHow to Draw Alex from Minecraft (Design 2)Cute / chibi · Ages 7-9
 PDFHow to Draw Minecraft AlexCute / chibi · Ages 7-9
 PDFHow to Draw Minecraft a Baby Happy GhastCute / chibi · Ages 7-9
 PDFHow to Draw Minecraft a Chicken Jockey (Design 2)Cute / chibi · Ages 7-9
 PDFHow to Draw Minecraft a Christmas CreeperCute / chibi · Ages 7-9
 PDFHow to Draw a Minecraft Creeper (Design 3)Cute / chibi · Ages 7-9
 PDFHow to Draw Cute Minecraft AlexCute / chibi · Ages 7-9
 PDFHow to Draw Minecraft an Enderman (Design 4)Cute / chibi · Ages 7-9
 PDFHow to Draw Minecraft an Enderman (Design 6)Cute / chibi · Ages 7-9
 PDFHow to Draw Minecraft Steve With Diamond ArmorCute / chibi · Ages 7-9
 PDFHow to Draw a Minecraft ZombieCartoon · Ages 7-9