
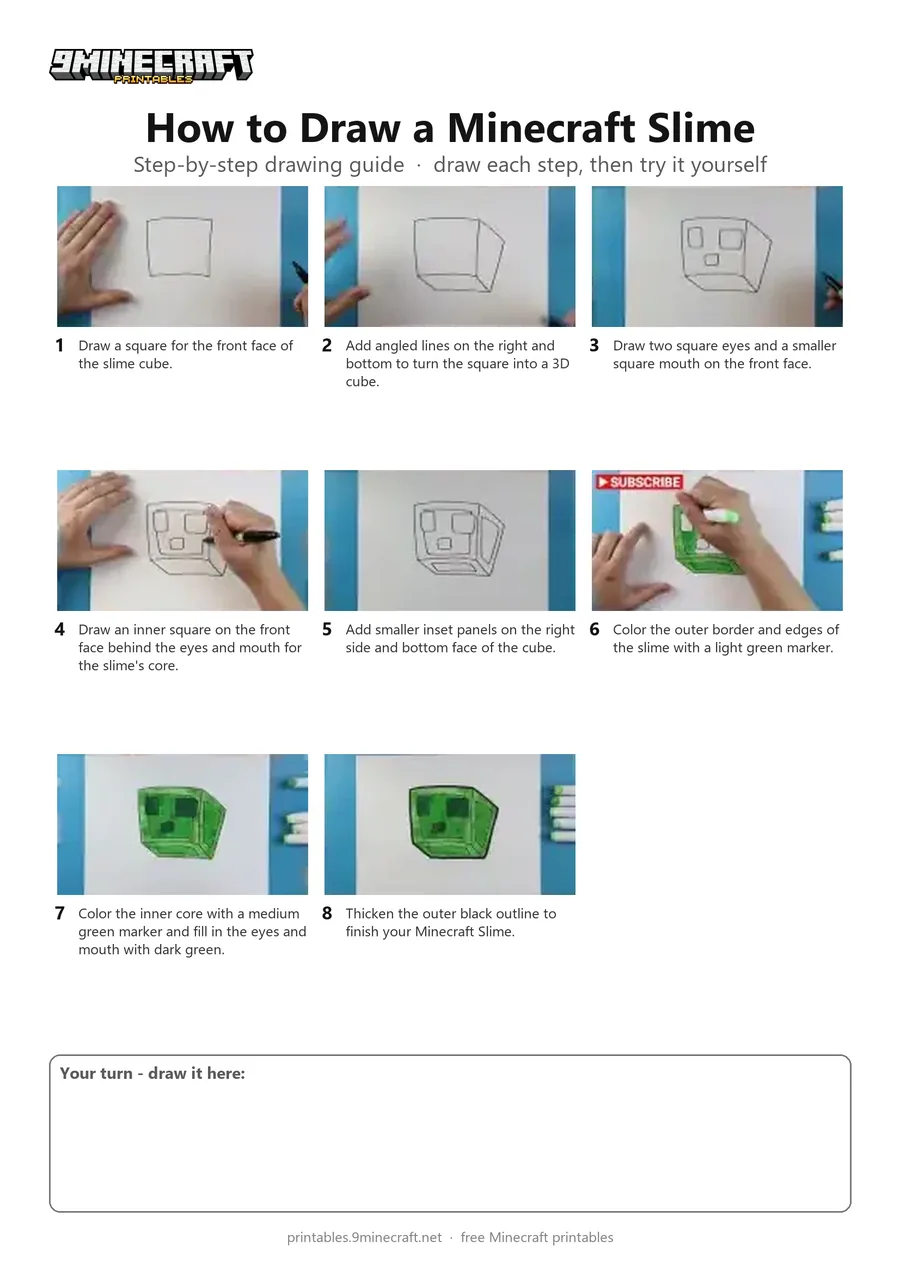
Learn how to draw a 3D Minecraft Slime cube showing its translucent outer layer and inner core. The tutorial uses a black marker for the blocky outlines and multiple shades of green markers to create a glowing, slimy texture. Free printable PDF for A4 and US Letter paper.
Print at 100% scale (“Actual size”). Plain printer paper works fine; crayons, colored pencils or markers all work.
 Draw a square for the front face of the slime cube.
 Add angled lines on the right and bottom to turn the square into a 3D cube.
 Draw two square eyes and a smaller square mouth on the front face.
 Draw an inner square on the front face behind the eyes and mouth for the slime's core.
 Add smaller inset panels on the right side and bottom face of the cube.
 Color the outer border and edges of the slime with a light green marker.
 Color the inner core with a medium green marker and fill in the eyes and mouth with dark green.
 Thicken the outer black outline to finish your Minecraft Slime.
You need: paper, black marker, green markers.
Video by Art Land on YouTube.
 More How to Draw
 PDFHow to Draw Alex from MinecraftSimple · Ages 7-9
 PDFHow to Draw Alex from Minecraft (Design 3)Simple · Ages 7-9
 PDFHow to Draw Alex from Minecraft (Design 4)Simple · Ages 7-9
 PDFHow to Draw a Minecraft ChestSimple · Ages 7-9
 PDFHow to Draw a Minecraft Copper GolemSimple · Ages 7-9
 PDFHow to Draw a Minecraft Creeper (Design 2)Simple · Ages 7-9
 PDFHow to Draw Minecraft a CreeperSimple · Ages 7-9
 PDFHow to Draw Minecraft an Enderman Holding a Grass BlockSimple · Ages 7-9
 PDFHow to Draw Minecraft an EndermanSimple · Ages 7-9
 PDFHow to Draw a Minecraft Grass BlockSimple · Ages 7-9
 PDFHow to Draw Herobrine from MinecraftSimple · Ages 7-9
 PDFHow to Draw Minecraft Herobrine (Design 2)Simple · Ages 7-9