
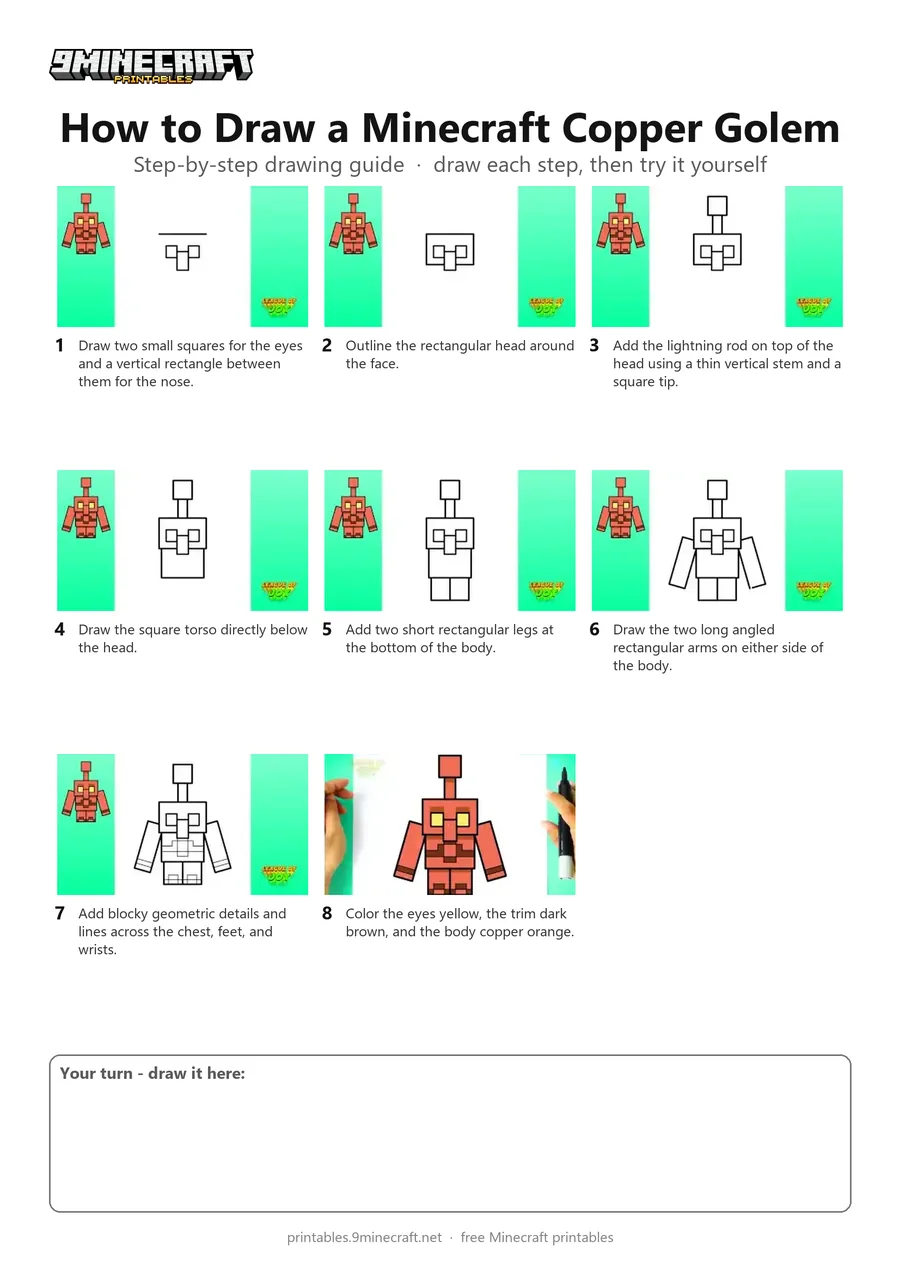
Learn how to draw a blocky Minecraft Copper Golem with a lightning rod on its head. This step-by-step guide uses simple geometric shapes and straight lines to build the character from the face outwards before coloring it in. Free printable PDF for A4 and US Letter paper.
Print at 100% scale (“Actual size”). Plain printer paper works fine; crayons, colored pencils or markers all work.
 Draw two small squares for the eyes and a vertical rectangle between them for the nose.
 Outline the rectangular head around the face.
 Add the lightning rod on top of the head using a thin vertical stem and a square tip.
 Draw the square torso directly below the head.
 Add two short rectangular legs at the bottom of the body.
 Draw the two long angled rectangular arms on either side of the body.
 Add blocky geometric details and lines across the chest, feet, and wrists.
 Color the eyes yellow, the trim dark brown, and the body copper orange.
You need: marker, colored markers.
Video by League of Joy - How to Draw on YouTube.
 More How to Draw
 PDFHow to Draw Alex from MinecraftSimple · Ages 7-9
 PDFHow to Draw Alex from Minecraft (Design 3)Simple · Ages 7-9
 PDFHow to Draw Alex from Minecraft (Design 4)Simple · Ages 7-9
 PDFHow to Draw a Minecraft ChestSimple · Ages 7-9
 PDFHow to Draw a Minecraft Creeper (Design 2)Simple · Ages 7-9
 PDFHow to Draw Minecraft a CreeperSimple · Ages 7-9
 PDFHow to Draw Minecraft an Enderman Holding a Grass BlockSimple · Ages 7-9
 PDFHow to Draw Minecraft an EndermanSimple · Ages 7-9
 PDFHow to Draw a Minecraft Grass BlockSimple · Ages 7-9
 PDFHow to Draw Herobrine from MinecraftSimple · Ages 7-9
 PDFHow to Draw Minecraft Herobrine (Design 2)Simple · Ages 7-9
 PDFHow to Draw a Minecraft HorseSimple · Ages 7-9